
Cention Chat Robot API
The purpose of this document is to describe the Cention Chat Robot API which you can use to integrate your chat robot with Cention so that your chat robot can communicate with a client just like if it was a real agent.
In order for your chat robot to be allowed to receive communication from a client
you must from within Cention create a JSON web token which should be included in
the Authorization header in all requests to Cention.
When creating your JSON web token you will specify the webhook URL which Cention will use to communicate with your chat robot and the user in Cention which your chat robot should act as when communicating with clients. If either of these are changed in Cention your previously generated JSON web token will no longer be authorized and you will have to use the new JSON web token.
Cention expects the Authorization header to be defined using the Bearer schema.
Authorization: Bearer eyJhbGci...<snip>...yu5CSpyHI
To reach the right Cention configuration you need to specify the name of your Cention workspace in the URL. If the name of your Cention workspace is “demo” the URL for registering would look like this:
https://apid.cention.com/s/demo/api/bot/register
The first step in the communication is for your chat robot to register itself with Cention. After successful registration your chat robot will receive requests from clients it should answer.
Registering is done by sending a HTTP POST request to Cention. You need to register in order to tell Cention that your chat robot is ready to start accepting requests on the webhook URL.
https://apid.cention.com/s/$workspace/api/bot/register
Cention will respond to your register request with JSON content in
the request body. If the register request is successful then Cention
will respond back with the information it has about your chat robot
such as the webhook URL. If the register request failed then Cention
will respond with an error object.
{
	"registered": true,
	"url": "https://mydomain.com/bot/webhook"
}{
"error": {
"message": "Invalid JSON web token"
}
}When a client has initiated a new chat or in subsequent communication from a client who is already chatting your chat robot will receive a request on the webhook URL registered when creating the JSON web token.
Cention will do a HTTP POST request to the webhook URL with JSON content in the request body. Your chat robot should give one of multiple types of responses defined below.
Each communication with a client will be identified using a unique
sessionId. Subsequent communication in the same session from the same
client will be identified using the same sessionId throughout the whole
session.
The webhook URL can receive different types of requests. For example when
the client sends a new message the webhook URL will receive a request of
type message and when the client clicks on a postback button the webhook
URL will receive a request of type postback. Depending on the request type
the JSON content will have different fields. The following base fields will
be present in all requests.
| Field | Type | Description |
|---|---|---|
| sessionId | integer | Unique identifier for this session |
| client | object | Client information object (name etc) |
| externalData | string | Extra data that was provided when chat was started |
| type | string | Request type |
| maxLength | integer | Maximum length for response content |
The content of the client object is as follows.
| Field | Type | Description |
|---|---|---|
| name | string | The client’s name |
| string | The client’s email address |
| Type | Description |
|---|---|
| message | Sent when client writes new message |
| postback | Sent when client click postback button |
The message request will contain all base fields described above and also the following field.
| Field | Type | Description |
|---|---|---|
| message | string | The message from the client |
{
	"sessionId": 12345,
	"client": {
		"name": "John Doe",
		"email: "john.doe@example.com",
	},
	"externalData": "<b>Customer number:</b> 12345",
	"type": "message",
	"message": "Hello World!",
	"maxLength": 280
}The postback request will contain all base fields described above and also the following fields.
| Field | Type | Description |
|---|---|---|
| postback | object | Postback object |
The content of the postback object is as follows.
| Field | Type | Description |
|---|---|---|
| title | string | Name of button that was clicked |
| data | string | Data defined in button template |
{
	"sessionId": 12345,
	"client": {
		"name": "John Doe",
		"email: "john.doe@example.com",
	},
	"type": "postback",
	"postback": {
		"title": "Postback button!",
		"data": "Data defined in button template."
	},
	"maxLength": 280
}The answer response is what the chat robot should return if it has an answer to the client’s message.
The response should contain the following JSON content.
| Field | Type | Description |
|---|---|---|
| type | string | The type of response returned by your chat robot |
| contentType | string | The content type that describes the content |
| content | string | The content that should be passed on to the client |
| attachments | array | A list of attachments |
The answer response can contain attachments in the attachments variable.
The attachments variable is an array of objects. There should be one object
for each attachment.
The following attachment types are supported.
| Type | Description |
|---|---|
| file | Image, PDF, etc |
| template | Button, etc |
File attachment allows you to send a raw file such as a PDF.
| Field | Type | Description |
|---|---|---|
| name | string | The attachments’s file name |
| type | string | The file’s mime type |
| data | string | Base64 encoded file |
{
	"type": "answer",
	"contentType": "text/html",
	"content": "<strong>Hello World!</strong>",
	"attachments": [
		{
			"type": "file",
			"data": {
				"type": "image/png",
				"name": "example.png",
				"data": "iVBORw0KGgoAAAANSUhEUgAAAAUAAAAFCAYAAACNbyblAAAAHElEQVQI12P4//8/w38GIAXDIBKE0DHxgljNBAAO9TXL0Y4OHwAAAABJRU5ErkJggg=="
			}
		}
	]
}Template attachment allows you to send a structured message. See Templates for complete information about templates.
{
	"type": "answer",
	"contentType": "text/html",
	"content": "<strong>Hello World!</strong>",
	"attachments": [
		{
			"type": "template",
			"data": {
				// TEMPLATE_DATA
			}
		}
	]
}When a client has sent a message which your chat robot has no answer for or if the client has triggered something that means the client should be connected to a real agent your chat robot should respond with the handover type.
Optionally you can include an area identifier in the response if you want to look for available agents in another area than the one the the chat is currently connected to.
| Field | Type | Description |
|---|---|---|
| type | string | The type of response returned by your chat robot |
| areaId | integer | The area identifier for where to look for agents (optional) |
{
	"type": "handover"
}When a client has sent a message which your chat robot can’t or shouldn’t respond to immediately your chat robot can respond with the empty type.
| Field | Type | Description |
|---|---|---|
| type | string | The type of response returned by your chat robot |
{
	"type": "empty"
}When you no longer want your chat robot to handle requests from clients you need to deregister with Cention. You deregister by sending a HTTP POST request to Cention.
https://apid.cention.com/s/$workspace/api/bot/deregister
Cention will respond to your deregistration request with JSON content
in the request body. If the deregistration failed then Cention will
respond with an error object.
{
	"registered": false
}{
"error": {
"message": "Invalid JSON web token"
}
}Your chat robot can send a message to the client at any time by sending a HTTP POST request to Cention.
https://apid.cention.com/s/$workspace/api/bot/message
You can use all the same fields for file attachments and templates as when you receive a new message on the webhook URL and responds to a client’s question. See Response: Answer for more information.
| Field | Type | Description |
|---|---|---|
| sessionId | integer | Identifier for session message should be sent to |
| contentType | string | The content type that describes the content |
| content | string | The content that should be passed on to the client |
| attachments | array | A list of attachments |
{
	"sessionId": 12345,
	"contentType": "text/html",
	"content": "<strong>Hello World!</strong>",
	"attachments": []
}Cention will respond to your message request with JSON content in
the request body. If delivering the message failed then Cention will
respond with an error object.
{
	"received": true
}{
"error": {
"message": "Invalid JSON web token"
}
}Your chat robot can end a chat at any time by sending a HTTP POST request to Cention. A closed chat will be not be able to receive any new messages from both the client and the chat robot.
https://apid.cention.com/s/$workspace/api/bot/close
| Field | Type | Description |
|---|---|---|
| sessionId | integer | Identifier for session message should be sent to |
Cention will respond to your close request with JSON content in the request
body. If closing the chat sesssion failed then Cention will respond with
an error object.
{
	"closed": true
}{
"error": {
"message": "Invalid JSON web token"
}
}Your chat robot can leave internal comments only visible to human agents.
https://apid.cention.com/s/$workspace/api/bot/comment
| Field | Type | Description |
|---|---|---|
| sessionId | integer | Identifier for session comment should be added to |
| contentType | string | The content type that describes the content |
| content | string | The content of the comment |
{
	"sessionId": 12345,
	"contentType": "text/html",
	"content": "<strong>Hello World!</strong>"
}Cention will respond to your comment request with JSON content in
the request body. If adding the comment failed Cention will respond
with an error object.
{
	"received": true
}{
"error": {
"message": "Invalid JSON web token"
}
}As an attachment to an answer you can include a template. A template allows you to send a structured message.
| Type | Description |
|---|---|
| button | Text message with buttons |
The button template sends a text message with one or more buttons. A button template can include different types of buttons.
| Type | Description |
|---|---|
| url | Opens a web page with the specified URL |
| postback | Requests webhook URL with the postback type |
{
	"type": "button",
	"text": "This is a URL button!",
	"buttons": [
		{
			"type": "url",
			"title": "URL button",
			"url": "https://open.thisurl.com"
		}
	]
}{
"type": "button",
"text": "This is a postback button!",
"buttons": [
{
"type": "postback",
"title": "Postback button",
"data": "Data sent to webhook URL when button is clicked."
}
]
}Your chat robot can send a WhatsApp hsm type template to the WhatsApp client at any time by sending a HTTP POST request to Cention.
https://apid.cention.com/s/$workspace/api/bot/watemplate
You can send answer to whatsapp client chat when you receive a new message on the webhook URL and responds to a client’s question.
| Field | Type | Description |
|---|---|---|
| sessionId | integer | Identifier for session message should be sent to |
| contentType | string | The content type that describes the content |
| content | json | WhatsApp template information that needs to translate as per API documents and should be sent through the whatsapp API |
{
	"sessionId": 12345,
	"contentType": "text/html"
	"content": {"elementname":"<whatsapp templates elementname>", "namespace": "<whatsapp templates namespace>", "params":[{"default": "$10", "order": "1234"}]}
}Let say customer created a hsm template and waiting WhatsApp’s approval. The template looks like bellow:
You made a purchase for {{1}} using a credit card ending in {{2}}.
The hsm template parameter contains a namespace and an element_name pair that identify a template and the values to apply to variables in that template. The namespace and element_name parameters must match up or the message will fail to send.
When the above API call happen, then following things will be converted before sending to whatsapp API.
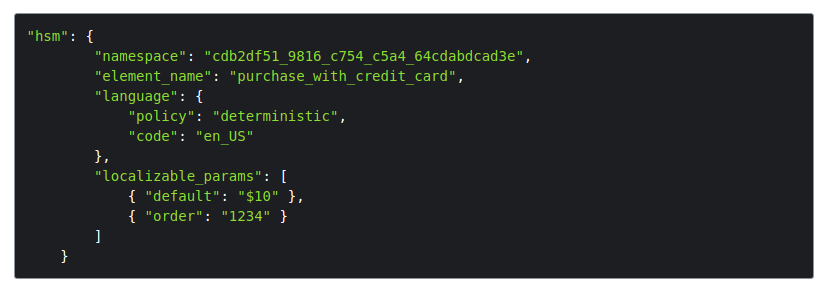
As you can see from looking at the localizable parameters and the message the client received, the template used the default value of 10 as the amount of the purchase and the order value of 1234 as the last numbers of the account.
When sending a message template, the hsm object is required. To define message templates, you specify a namespace and an element_name pair that identify a template. Templates have parameters that will be dynamically incorporated into the message. For the example used in this document, the message template looks like this:
You made a purchase for {{1}} using a credit card ending in {{2}}.
For “namespace”: “cdb2df51_9816_c754_c5a4_64cdabdcad3e” with “element_name”: “purchase_with_credit_card”, the first value you list replaces the {{1}} variable in the template message and the second value you list replaces the {{2}} variable. The curly braces items will replaced by the api params option.